I don’t know about you, but around 10 years into my career as an English teacher, I got sick and tired of dragging students through essays one paragraph at a time. This was true despite the fact that I was actually quite good at it. I could get my teenage students to write strong introductions with great hooks and informative, even tantalizing, thesis statements. However, getting them to the point where they could actually comprehend the relationship between the thesis statement and the rest of the essay was like trying to get a group of blindfolded people to tell me if there was a bit of spinach on my teeth. It was as though I had gone from being a perfectly good English teacher to being a horribly confusing math teacher. It was as though I had started speaking a different language that no one understood while rearranging the furniture while wearing a Kabuki mask and talking through a moving fan–underwater. Nothing I tried seemed to get through.
Of course I taught my students how to write a standard outline. Mostly, they just didn’t get it. If they did get it, they hated it. I showed them and shared with them all kinds of graphic organizers. Together, we completed scores of webs, concept maps, T-charts and tree charts, flow charts, affinity diagrams, Venn diagrams, fishbones, scatterplots, and any number of creative variations on these. Sometimes these attempts were successful, but the visual aspect of the graphic organizer in general failed to revolutionize the writing of the essay, contrary to all the hype. Even my “visual” learners ultimately got lost in their webs and charts and finally resorted to bulleted lists that they revised until a logical sequence emerged. So, fed up, I went to the World Wide Web, and what did I find? Sadly, more of the same. I figured out that what I needed was a fill-in-the-blank system with simple instructions for creating the finished product.
What I devised is pretty bland, if you ask me, but it works like a charm. My junior high students find the organizer very easy to follow, but the beauty part is, they are tickled to see that when they are done filling in the blanks, they have what amounts to a very well-organized rough draft. Because it seems as though they’ve skipped a step in the writing process, they don’t mind meeting with peers or me for revision conferences. More tickling is the fact that the precision of the organization eliminates the need for reorganizing big chunks of their writing. They may choose to move paragraphs around, but the organizer we use works as a paragraph organizer within an essay organizer, so the relationships among the sentences are logically determined before the essay is finally pieced together. I won’t say it’s genius, but it sure does away with a lot of frustration on both our parts.
I took some ideas that I had been using all along and merged them, and what I ended up with is something I call a “Stoplight Essay Organizer.” It works like this: you take the “stoplight” paragraph organization formula that many good methods utilize (I learned about it when teaching the “Step Up to Writing” method) and integrate it with a standard 5-paragraph essay structure. You add prompts for writing a hook and setting up the supporting points for the thesis (as well as writing the thesis), encourage a transition, and send the little scholars on their way through the body paragraphs, each of which has the same structure. The body paragraphs are linked with examples from the introductory paragraph, and the formula for the conclusion brings in elements from the introduction and each of the body paragraphs.
I know that a lot of note taking and organizing can now be done via Web-based applications, but my students fare much better working with hard copies and using their hands to take notes. It is well known that writing by hand benefits memory when taking notes (see http://pss.sagepub.com/content/25/6/1159, along with many others), but my students prefer to complete their organizers and write their rough drafts by hand, also. Obviously, different students will have different preferences, and this type of organizer can easily be converted into a digital document with form fields as well. The system has worked well as is for me and for most of my students, and I am sharing the idea with you. Ultimately, I believe it is the prompts that make the difference.
It is easier to explain, of course, with pictures, which I have posted below. I actually sell this item at my Teachers Pay Teachers store, so even though you could just copy it or use it as a model to make your own, I would of course rather have you visit my store through the link below and spend the buck and a half on a really effective organizer that took a lot of time and effort to create and that has been field-tested for you. I really do want to help my fellow struggling teachers, though, so I’m not going to pester you for sales. And I won’t know unless you tell me, anyway. Here’s the link if you decide you’d like to buy or even just to see some of my other products:
https://www.teacherspayteachers.com/Product/5-Paragraph-Stoplight-Essay-Organizer-462623
Please leave a little feedback (here as well as there). Let me know if I can improve on my delivery of information or products. I’ve always considered myself more of an editor than a writer, and editing my own writing is more difficult for me than diagramming a Shakespearean sonnet. So yes, be gentle, but please do offer feedback . . . and questions! I love to answer your questions! Thanks for visiting!
Here is the “Stoplight Paragraph Organizer” (available for $1.50 at the link above if you desire to help support a struggling teacher in her efforts to improve the world):
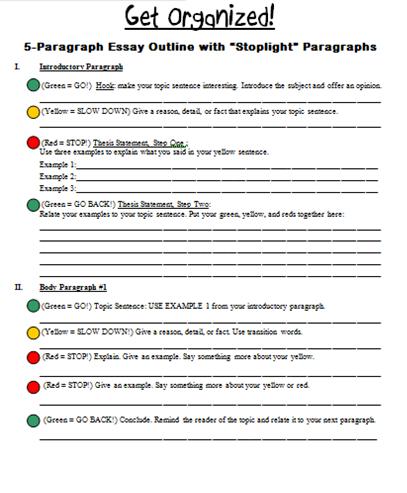
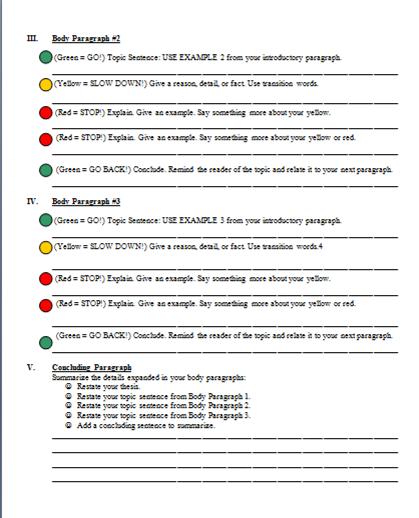
Students use this organizer along with their Cornell notes (although any research and note-taking system can be used). Prompts help the student to determine which items to include and where to place them.
